Tutorial Add Plugins settings Email Notification


 Add Plugins Settings

Configure Email Notification Settings.

1. Download a plugin like follows. Make sure latest one and get it on the site below. http://docs.cacti.net/plugins

[root@localhost plugins]#cd /var/www/html/cacti/plugins

[root@localhost plugins]#wget http://docs.cacti.net/_media/plugin:settings-v0.71-1.tgz

[root@localhost plugins]#tar zxvf /var/www/html/cacti/plugins/plugin\:settings-v0.71-1.tgz

2. Login to Cacti admin site and click "Plugin Management" on the left menu and click cursor on the Settings field icon in the right pane.


3. Click cursor button to enable the plugin.


4. After enabling, the stauts turns to Active.


5. Click "Settings" on the left menu and move to "Mail/DNS" tab on the right pane and input items like follows and click "Save" button.
Test Mail  ⇒ recipient's address for test mail
Mail Services  ⇒ the service for using sending email
From Email Address  ⇒ the address for "From"
From Name  ⇒ the name for "From"

After saving settings, click "Send a Test Email" to make sure email is sent normally.


6. Before you test whether Cacti can send notification emails, you must enable the less secure apps feature in your Gmail account via the URL:

https://myaccount.google.com/lesssecureapps


7. After successing sending emails, it is displayed "Success".


Troubleshooting.

Let's get to the answer first of all! Try with the following command:

# getsebool httpd_can_sendmail

if it shows: httpd_can_sendmail --> off


switch it on with this:

# sudo setsebool -P httpd_can_sendmail 1

then try sending the email again.


This solution comes from this great page.

As it was pointed out from this article, you may also need to try sudo setsebool -P httpd_can_network_connect 1. While for my CentOS 7 vm hosted by DigitalOcean, it's not necessary.

The problem I met was failing to send out emails from a Drupal website, with the SMTP Authentication Support module, which relies on PHPMailer underneath. And the SMTP server used was Google.

BTW, I had suspected it was OpenSSL certificate problem and did some test but no luck. So by setting the $SMTPDebug level to 2 from the PHPMailer source code, I was able to capture the "Permission denied (13)" error message.

Install Cacti 0.8.8 on CentOS 6/7


Step 1 – Prerequisites

First we need to install some of the software packages needed for Cacti to run properly. Software which is not included or enabled in the base CentOS 6 installation are:

rrdtool
apache
mysql
cron
Gcc

Let’s use yum to get these installed.

Centos 6:
yum -y install mysql-server php php-cli php-mysql net-snmp-utils rrdtool php-snmp gcc mysql-devel net-snmp-devel autoconf automake libtool dos2unix wget help2man

Centos 7:
yum -y install mariadb-server php php-cli php-mysql net-snmp-utils rrdtool php-snmp gcc mariadb-devel net-snmp-devel autoconf automake libtool dos2unix wget help2man

gcc and the devel packages are required for the installation of spine, hence that’s why we include it here.

Now let’s make sure that our webserver and the database are automatically starting up after a reboot. Use the following commands to enable these:

CentOS 6:
chkconfig httpd on
chkconfig mysqld on

CentOS 7:
systemctl enable httpd.service
systemctl enable mariadb.service

Now that we did make sure that these services start after a reboot, let’s start them manually now in order to continue the installation. Cron may already be running so don’t panic if you don’t see the usual start message:


CentOS 6:
service httpd restart
service mariadb restart

CentOS 7:
systemctl restart httpd.service
systemctl restart mariadb.service

[the_ad_placement id=”default-manual”]


Step 2 – Cacti Files

Let’s now move to the actualy installation of Cacti. First we need to download and extract it. As of version 0.8.8, a fully patched Cacti including the Plugin Architecture (PIA) is officially available, so we’re downloading that one:

cd /var/www/html
wget http://www.cacti.net/downloads/cacti-0.8.8h.tar.gz
tar -xzvf cacti-0.8.8h.tar.gz

I usually suggest to create a symbolic link to the newly created directory “cacti-0.8.8h”. This will make upgrades to never Cacti versions easier:

ln -s cacti-0.8.8h cacti


Step 3 – Cron and file permissions

Cacti uses cron (scheduled task) in order to execute its polling process.  It’s always a good idea to run this under a special user. Let’s create the system “cacti” user now:

adduser -d /var/www/html/cacti -s /sbin/nologin cacti

Having done that, we can now  add a new cron entry to your system for a 5 minute polling interval using the following command:

echo "*/5 * * * * cacti php /var/www/html/cacti/poller.php &>/dev/null" >> /etc/cron.d/cacti

Finally, we also need to make sure that the permissions on the log and rra directories are set correctly:

cd /var/www/html/cacti
chown -R cacti.apache rra log  
chmod 775 rra log


Step 4 – Cacti Database

Now that we have extracted the cacti files, we can move on preparing the database for the final installation step. Your first step should be securing the mysql database. The following command will help you with this task on a CentOS system. Make sure to select a strong password for root, e.g. Regen123

/usr/bin/mysql_secure_installation

Let’s create a new database and assign a special user to it:

mysqladmin -u root -p create cacti
mysql -p cacti < /var/www/html/cacti/cacti.sql
mysql -u root -p

With the last command, you should be seing a mysql prompt where you can enter mysql commands. Here we are going to create the special cacti user. That user only needs to be able to connect from the local system and should have a strong password as well. Enter the following commands and make sure to replace the password:

GRANT ALL ON cacti.* TO cactiuser@localhost IDENTIFIED BY 'Regen123';
flush privileges;
Exit

We now have the cacti files and the cacti database setup. The last step before moving to the web-based installer is setting the database credentials within the Cacti config file:

cd /var/www/html/cacti/include/
nano config.php

Change the $database_ lines to fit your new settings:

$database_type     = "mysql";
$database_default  = "cacti";
$database_hostname = "localhost";
$database_username = "cactiuser";
$database_password = "Regen123";
$database_port      = "3306";
$database_ssl        = false;

Depending on your installation, you should also uncomment the following line. In our example we have to make sure the following line is there:

$url_path = "/cacti/";


Step 5 – Adding firewall rules

The following settings will add access rules to http and https from outside:

Centos 7:
firewall-cmd --permanent --zone=public --add-service=https
firewall-cmd --permanent --zone=public --add-service=http
firewall-cmd --reload


Step 6 – Important PHP Settings

The default PHP installation usually has not configured the correct timezone or php error reporting. While not required to run Cacti, it’s highly recommended to enable error reporting to syslog for troubleshooting issues with plugins or other scripts.

The following lines need to be enabled/configued in your /etc/php.ini.

nano /etc/php.ini

; Defines the default timezone used by the date functions
; http://php.net/date.timezone
date.timezone = Asia/Jakarta

and

; Log errors to syslog (Event Log on NT, not valid in Windows 95).
error_log = syslog


Step 7 – Running the Web-based installer

Let’s move on to the web-based installer.


Login with admin/admin and you’re ready to go !


Tutorial Bootable Flashdisk/DVD

Assalamualaikum..wr..wb.
    Hallo temen-temen selamat dtang di website saya.
Pada kesempatan kali ini saya akan membuat artikel tutorial Bootable.


Kita perlu membuat bootable USB/DVD untuk meng-install OS di PC kita. Berikut cara membuat bootable USB/DVD menggunakan media DVD dan Flashdisk melalui Windows. Sebagai contoh kami menggunakan CentOS yang akan dijadikan bootable.

Membuat bootable DVD

Untuk membuat bootable DVD lebih mudah daripada bootable USB, karena kita tinggal mem-burn file iso yang telah kita download kedalam DVD tersebut. Setelah anda mendownload file .iso yang akan dijadikan bootable, selanjutnya klik kanan, lalu pilih “Burn disc image”:

Pilih lokasi DVD Drive, lalu klik Burn:


Tunggu sampi proses Burning selesai:


Setelah proses Burning selesai, DVD akan otomatis keluar dari DVD ROM:


Membuat Bootable USB
Disini kami menggunakan aplikasi Rufus untuk membuat bootable USB, anda dapat mendownloadnya di:

https://rufus.akeo.ie/downloads/rufus-2.12.exe

OS yang akan kita jadikan bootable adalah CentOS, anda juga dapat menggunakan OS lain sesuai kebutuhan anda seperti Windows 10, Ubuntu atau yang lainnya.


Setelah mendownload, jalankan aplikasi Rufus, pastikan FlashDisk sudah tercolok di PC. Berikut tampilan aplikasi Rufus:


Pastikan File system yang dipilih NTFS atau FAT32 :


Klik tombol Disc untuk memilih file .ISO yang akan dijadikan bootable :


Pilih file .ISO yang akan dijadikan bootable :


Dibawah akan keluar keterangan “Using image: CentOS…”, klik Start untuk memulai proses Writing Image:


Klik OK untuk menjalankan writing menggunakan mode ISO Image :


Klik OK pada pesan konfirmasi yang muncul :


Tunggu hingga proses writing selesai :


Proses writing akan berjalan beberapa menit, restart PC dan colokkan FlashDisk untuk melakukan proses instalasi:


Oke sekian dari saya selamat mencoba semoga berhasil.

Wassalamulaikum..wr..wb.


Tutorial Instalasi Centos7

Assalamualaikum..wr..wb.
     Hallo temen-temen selamat datang di  website saya.
Pada kesempatan kali ini saya akan membuat artiket Tutorial Instalasi CentOS 7, pada kesempatan kali ini saya menggunakan CentOS 7 Minimal (tanpa desktop), namun untuk caranya sama dengan instalasi CentOS 7 dengan desktop sehingga tetap bisa mengikuti.

Oke pertama tentu saja siapkan flashdisk untuk media bootable USB nya karena kita akan menginstall CentOS via flashdisk. 
Untuk memuat bootable nya bisa dengan Rufus, Unebootin, Etcher, LiLi USB, atau yang lain. Sesuai selera, kalo bingung cara boottablenya silahkan kunjungi artikel boottable saya berikut :

Dan jangan lupa sediakan free space minimal 20GB.

Langsung saja kita coba instalasi !

Setelah anda memiliki bootable CentOS, masukkan bootable centos, dan restart PC untuk mulai booting ke CentOS.
System akan me load installer dan segera memunculkan welcome screen.

Step 1 - Pilih Install CentOS 7.

Step 2 - Pilih bahasa instalasi. Silahkan pilih bahasa sesuai kemauan, saya pilih English.

Step 3 - Konfigurasi.

Pada bagian Date and Time ini untuk mengatur waktu dan timezone.
Di bagian Software Selection kalian bisa mengatur apa yang ingin diinstall (Destop / Minimal Dll). 
Pada kesempatan kali ini saya install yang versi minimal, tanpa desktop.
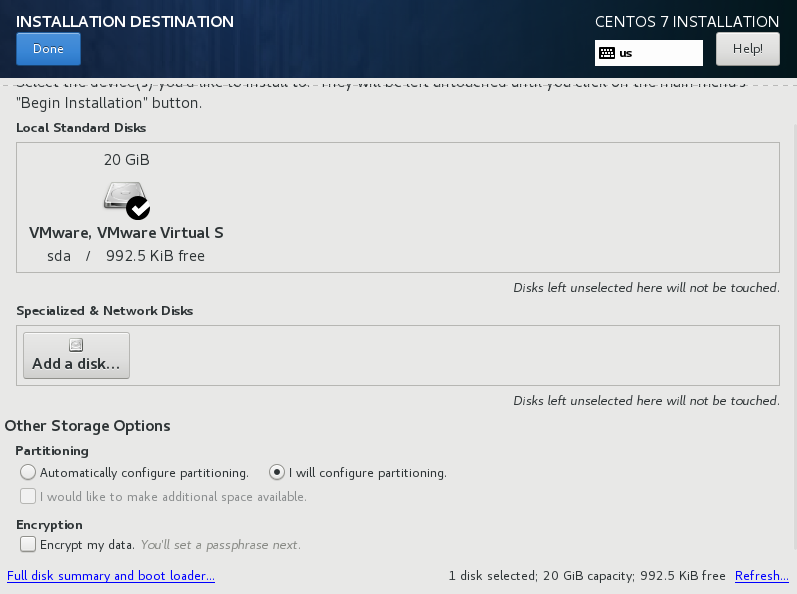
Pada bagian Installation Destination kalau memang harddisk nya masih kosong boleh langsung pilih Automatic saja. Tapi jika ingin dualboot, atau ingin membagi partisi nya secara terpisah, atur ke manual. Pilih i will configure partitioning

Selanjutnya dari 20GB yang telah disediakan, berikut pembagiannya:
  • / - (system) 10GB
  • /home - 5GB
  • swap -5GB
Device type pilih Standard Partition. File system pilih ext4 atau xfs.


Jika sudah selesai klik Done.

Step 4 - Mulai instalasi. Klik Begin Installation.

Saat proses instalasi, kalian setting password untuk root. Untuk user bisa dibuat sekalian atau bisa juga nanti saja ketika sistem sudah terpasang.


Step 5 - Reboot. Saat proses instalasi selesai, reboot sistem.


Oke instalasi selesai.
Sekian dari saya selamat mencoba semoga berhasil.

Wassalamualaikum..wr..wb